Building a website with a web template
Getting Started
If you are willing to learn a little bit of HTML and how to use an editor, building your website using a prebuilt web template can save you a lot of time and effort.
We'll use one of our free Free Liquid Templates in this tutorial.
If this is your first website you should complete our Basic HTML tutorial before you begin this exercise. It's all copy and paste and provides a lot of other essential information about the web site building process.
Choosing a template
There are a few things to consider before choosing a web template that will be used to build your website.
If you already have an idea about what you want your site to look like it may make the job of choosing the correct template a little easier.
- Consider these points:
- 1...The colors of your chosen template can be changed. That is, of course, if you are using one of our free templates.
- 2...The images included with the template can be replaced with your own.
- 3...All font types and colors can be changed using the CSS style sheets.
Choose My Template
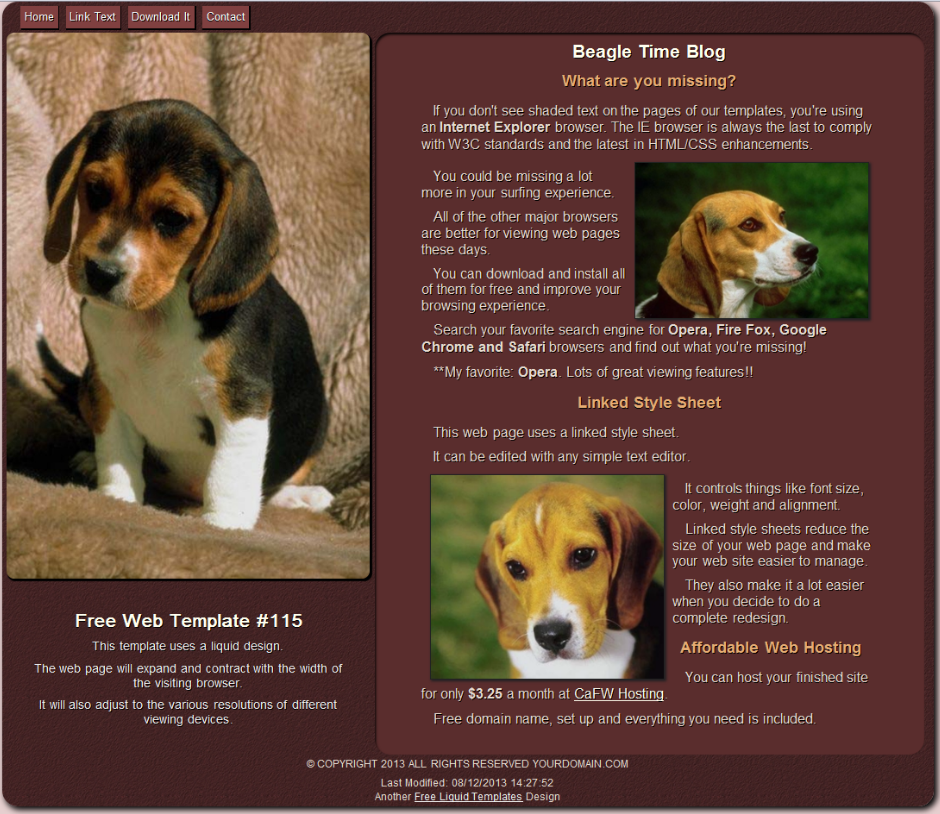
I'm going to choose template #115 from our Free Liquid Templates collection
This is a single page template from the 40/60 design section.
If you'd like to work along as I make the changes, you should download the zip file and extract it in your htdocs folder.
Since we're working with a single page, we'll modify the original template page and create our own version of the template we'll use to create the web site.
Modifying the Template
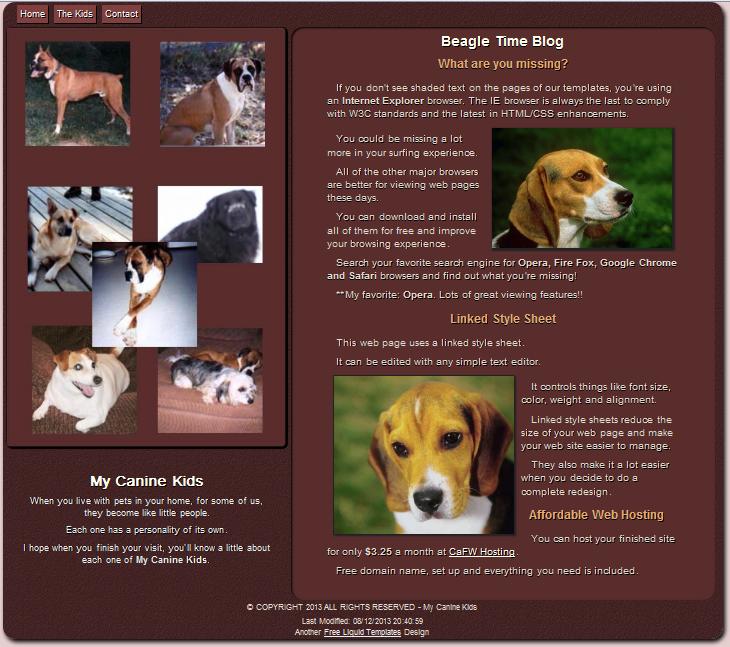
I'm going to build a web site that features my pets. There will 7 pages featuring pets, a home page and I'll add a contact page just to show how it's done.
Start at the Top
Start at the top and Change the Title.
I'll change mine to:
<title>My Canine Kids</title>
Setting Up the Links in the Navigation Device
The existing HTML code:
<nav>

<!--Edit links here - Add remove as needed-->


      <ul class="hnavbar" id="heading">

         <li><a href="http://www.freeliquidtemplates.com/">Home</a></li>

         <li><a href="#nowhere">Link Text</a>

            <ul>

               <li><a href="#nowhere">Sub Text</a></li>

               <li><a href="#nowhere">Sub Text</a></li>

               <li><a href="#nowhere">Sub Text</a></li>

               <li><a href="#nowhere">Sub Text</a></li>

            </ul>

         </li>

                  <li><a href="http://www.freeliquidtemplates.com/115.zip">Download It</a></li>

         <li><a href="#nowhere">Contact</a>

            <ul>

               <li><a href="#nowhere">About Us</a></li>

               <li><a href="#nowhere">Contact Form</a></li>

           </ul>

        </li>

      </ul>

</nav>
The New Navigation Code
Note: The links for the page are built using lists.
Anchor tags are set in list item tags <li><a href="#">Link Text</a></li>.
The drop down is created by nesting a second list <li><ul></li> in one of the list item tags.
The action of the drop down is created in the style sheet.
I'm setting up the links for the site as shown below:
<nav>

<!--Edit links here - Add remove as needed-->


      <ul class="hnavbar" id="heading">

         <li><a href="index.html">Home</a></li>

         <li><a href="#nowhere">The Kids</a>

              <ul>

                   <li><a href="cap.html">Captain</a></li>

                   <li><a href="lilman.html">Lilman</a></li>

                   <li><a href="charlie.html">Charlie</a></li>

                   <li><a href="lilla.html">Lilla</a></li>

                   <li><a href="chester.html">Chester</a></li>

                   <li><a href="lacy.html">Lacy</a></li>

                   <li><a href="gus.html">Gus</a></li>


              </ul></li>

                  <li><a href="contact.html">Contact</a></li>


      </ul>

</nav>
Replace the Large Background Image
The large background image (not really a background) is located in the left division:
<div class="left">
For best results replace this image with one of similar size. The original is 1000X1502 pixels. If you don't want to go that large, then try to keep the same aspect or ratio of height to width.
Note: We use the larger images because they perform better on the hi res machines that have displays as wide as 1920 pixels.
Size and crop the new picture with a program like PhotoScape and name it main-bkg.jpg
No need to change the code except for changing the alt info.
<img src="images/main-bkg.jpg" alt="Main Photo">
Add Site Title and Short Intro
You'll see this code below the main-bk.jpg image in the left division.
<h1>Free Web Template #115</h1>


<p>This template uses a liquid design.</p>

<p>The web page will expand and contract with the width of the visiting browser.</p>

<p>It will also adjust to the various resolutions of different viewing devices.</p>
We'll use this to present the title or name of our site and a short introduction.
I'll change mine to:
<h1>My Canine Kids</h1>


<p>When you live with pets in your home, for some of us, they become like little people.</p>

<p>Each one has a personality of its own.</p>

<p>I hope when you finish your visit, you'll know a little about each one of <b>My Canine Kids</b>.</p>
Modify the Footer
The orignial footer is shown here:
<footer>

<!--Edit footer here-->
<p>© COPYRIGHT 2014 ALL RIGHTS RESERVED YOURDOMAIN.COM</p>

<p><SCRIPT type="text/javascript">

<!--

var date
date=document.lastModified

document.write("Last Modified: "+date)

// -->

</SCRIPT></br>

Another <a href="http://www.freeliquidtemplates.com">Free Liquid Templates</a> Design</p></footer>
I changed it to:
<footer>

<!--Edit footer here-->
<p>© COPYRIGHT 2014 ALL RIGHTS RESERVED - My Canine Kids</p>

<p><SCRIPT type="text/javascript">

<!--

var date
date=document.lastModified

document.write("Last Modified: "+date)

// -->

</SCRIPT></br>

Another <a href="http://www.freeliquidtemplates.com">Free Liquid Templates</a> Design</p></footer>
The javascript simply tells your visitors the last time the page was updated. Is your information outdated?
I left the link to our template site in place. You can remove it if you desire.
Finished Modification
I've made all the changes I need to start creating my website.
I now have a template that I can use to easily create my other 8 web pages.
I'll save the finished transition as my-template.html
This will leave the index.html page in tact and I can load my-template.html into the editor and save it as each new page name.
We'll leave the code on the right side of the page alone and simply replace it with new information for each new page.
Continuing On
First I reload the index.html page and finish the info on the right side of the page to create: Finished Home Page
Next I load my-template.html into the editor and save it as cap.html
I'll make a slight change to the title tag and finish the information on the right side of the page to create my: Finished Cap Page
I'll use the same procedure to create the rest of my pet pages:
Finished Lilman
Finished Charlie
Finished Lilla
Finished Chester
Finished Lacy
Finished Gus.
The Contact page
Use the same procedure to create the contact page.
Here's the code for a simple form that asks for name, email address and a story submitted by the visitor.
<form name="MyKids" method="post" action="parse-mykids.php">

<p>Your Name: <input name="visitor" type="text" size="30" required="required"></p>

<p>Your Email: <input name="email" type="text" size="30" required="required"></p>

<p>The Story:<br><textarea name="story" rows="10" cols="60" required="required"></textarea><br>

<input type="submit" value="Send Story"><input type="reset" value="Reset"></p>

</form>
Yours will only differ in the form name(MyKids) and processing script name. (parse-mykids.php)
The Processing PHP Script
<?php


$visitor=$_POST['visitor'];

$email=$_POST['email'];

$story=$_POST['story'];


$msg = "Name: $visitor Email: $email  Story: $story";

$recipient = "your email-here\r\n";

$subject = "My Kids Story";

mail($recipient, $subject, $msg, "From: email-addressonyourserver","-f email-addressonyourserver");

?>


<html>

<head>

<title>Response page</title>

<style></style>

</head>

<body>

<?PHP

print "<p>Thanks for sharing.<br>";

print "<a href=index.html<Return to Site</a></p>";

?>


</body>

</html>
The form will take the information from your visitors and the script will send their submissions to your designated email address.
The From address would be a mail box you created on your web hosting account.
Note: If you try to execute the form on your Apache server(localhost), you will get an error on the mail part but you should get a link back to the site. Make sure the name you save the script as is the same in the action statement of your form.
You can dress the response page up using the embedded style sheet in the head section.
This is my finished Contact Page
That's the Process
There it is. The entire process of converting a free template into a website.
Now all you need is some Great Web Hosting to upload your site to.
Need Help?
If you are having problems or need an answer to a question, you can contact me using this form. Feel free to ask questions about using the tutor with HTMLPad 2014. Be sure to tell us which tutor you are using: 7 Step, Advanced #1, Template Tutor