Advanced HTML #1
Changing Appearance with CSS
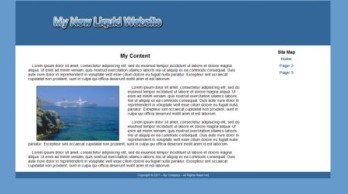
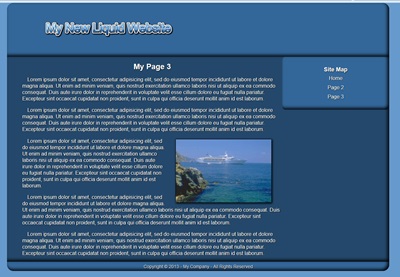
If you finished the Basic HTML tutorial, the next lesson is going to show you the power of the style sheet that is linked to your 3 page website.
You'll see how to make your basic HTML page look completely different just by changing the CSS.
The Power of the Style Sheet
Let's start making changes to style.css
Changing Font Color
At the top of the style sheet, change the default color and add the text-shadow after font-weight as shown.
body {

max-width: 1200px;

margin: 0 auto;

color: #fefefe;

background: #6699CC;

font-family: arial, tahoma, verdana, serif;

font-style: normal;

font-weight: normal;

text-shadow: 1px 1px 1px #010101
}
Save style.css and preview the pages.
You see what we need next.
Change the Background color
Change the background color on the main division as shown.
div.main {

width: 100%;

background: #24486b;

float: left

}
Save style.css and preview the pages.
Round the corners
Let's round the corners on the top and bottom of the web page.
We'll add border-radius to the header and footer as shown.
Don't forget the semi colon after the float.
header {

width: 100%;

background: #336799;

float: left;

border-radius: 20px 20px 0 0
}


footer {

width: 100%;

background: #336799;

float: left;

border-radius: 0 0 20px 20px

}
Save style.css and preview the pages.
You may need to maximize the browser to get a better picture of what's going on with the next few changes.
Fun with Box-shadow
One of the fun elements of CSS is box-shadow.
We'll add it to the header, main division, footer and to the image in the content section.
You might want to preview the pages after you add it to each section, just to see what it does.
Maximize the browser for a better view.
Add it to each section as shown. Notice, we reduced it on the image.
Don't forget the semi colons at the end of your lines.
header {

width: 100%;

background: #336799;

float: left;

border-radius: 20px 20px 0 0;

box-shadow: 5px 5px 10px #010101

}


div.main {

width: 100%;

background: #24486b;

float: left;

box-shadow: 5px 5px 10px #010101

}


footer {

width: 100%;

background: #336799;

float: left;

border-radius: 0 0 20px 20px;

box-shadow: 5px 5px 10px #010101

}


div.content img {

border: solid #000000 1px;

margin: .5% 4%;

max-width: 85%;

box-shadow: 2px 2px 6px #010101

}
Save all changes to style.css and preview the pages if you haven't done it.
Sexy Up the Nav
Now let's alter the nav element.
We'll add some padding, change its background color, round its corners and add some inset box-shadow.
nav {
Make adjustments to link colors and weight:
width: 20%;
padding: 2% 4%;
float: left;
background: #336799;
border-radius: 10px;
box-shadow: -5px -5px 10px #010101 inset
}
nav p a {

color:  #fefefe;

font-weight: 500;

line-height: 150%;

text-decoration: none

}


nav p a:hover {

color:  #6699CC;

text-decoration: underline

}
Save style.css and preview the pages.
Okay. The nav element now sticks out like a sore thumb.
Sexy the Rest
Now we'll go back and change all of the box-shadow we added to inset reversed.
Change the box-shadow on the header, main division and footer to:
box-shadow: -5px -5px 10px #010101 inset
Note: Be sure you only change the first 2 numbers to negative values.
Save style.css and preview the pages.
What a difference a few changes to the style sheet make.


...without touching the HTML code.
That's why we recommend that you spend more time learning CSS than you do HTML code.
You might spend a little time experimenting before you move on to Building a Website with a Template.
Need Help?
If you are having problems or need an answer to a question, you can contact me using this form. Feel free to ask questions about using the tutor with HTMLPad 2014. Be sure to tell us which tutor you are using: 7 Step, Advanced #1, Template Tutor
